# Clima
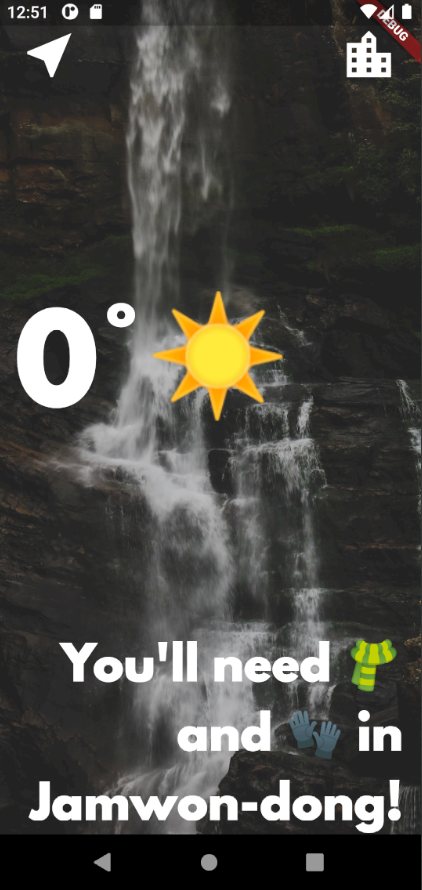
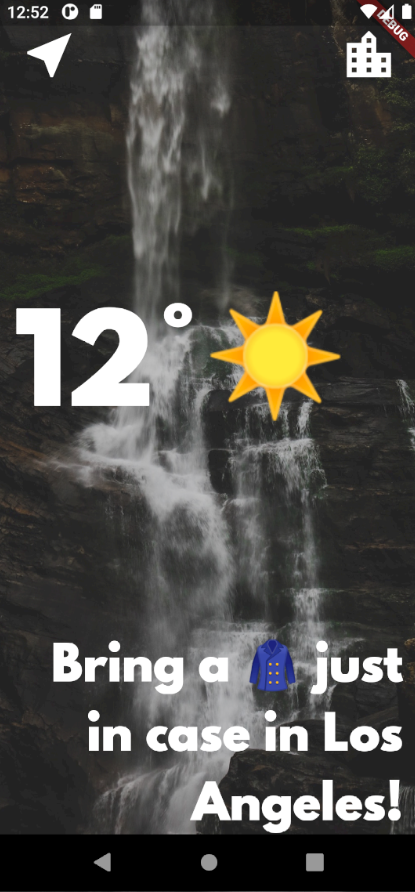
# 0. Final Product
- openweathermap-api / 기기의 위치 or 도시 검색을 통해서 날씨를 불러오는 앱
screens/services/utilities폴더를 나눠서 도메인 관리


# 1. Services
# weather services
networking.dart
import 'package:flutter/material.dart';
import 'package:http/http.dart' as http;
import 'dart:convert' as convert;

class NetworkHelper {
  final String appid;
  final double lat;
  final double lon;

  NetworkHelper(this.lat, this.lon, this.appid);

  Future getWeather() async {
    var url = Uri.https('api.openweathermap.org', '/data/2.5/weather',
        {'lat': '$lat', 'lon': '$lon', 'appid': '$appid', 'units': 'metric'});

    var response = await http.get(url);

    if (response.statusCode == 200) {
      var jsonResponse = convert.jsonDecode(response.body);
      return jsonResponse;
    } else {
      print(response.statusCode);
    }
  }
}
1
2
3
4
5
6
7
8
9
10
11
12
13
14
15
16
17
18
19
20
21
22
23
24
25
26
2
3
4
5
6
7
8
9
10
11
12
13
14
15
16
17
18
19
20
21
22
23
24
25
26
- API 요청을 보내는 로직
location.dart
import 'package:flutter/material.dart';
import 'package:geolocator/geolocator.dart';

class Location {
  double latitude;
  double longitude;

  Future<void> getLocation() async {
    try {
      Position position = await Geolocator.getCurrentPosition(
          desiredAccuracy: LocationAccuracy.high);
      latitude = position.latitude;
      longitude = position.longitude;
    } catch (e) {
      print(e);
      longitude = 126.9780;
      latitude = 37.5665;
    }
  }
}
1
2
3
4
5
6
7
8
9
10
11
12
13
14
15
16
17
18
19
20
21
2
3
4
5
6
7
8
9
10
11
12
13
14
15
16
17
18
19
20
21
geolocator을 이용해서 기기의 위치권한을 획득하고 위치를 확인할 수 있다.latitude,longitude그리고 위치를 확인하는getLocation메소드를 갖고 있는 클래스이다.
weather.dart
import 'package:flutter/material.dart';
import 'package:clima/services/location.dart';
import '../services/networking.dart';
const appid = '#######################';
class WeatherModel {
Future<dynamic> getLocationWeather() async {
Location location = Location();
await location.getLocation();
double lat = location.latitude;
double lon = location.longitude;
NetworkHelper networkHelper = NetworkHelper(lat, lon, appid);
var weatherData = await networkHelper.getWeather();
return weatherData;
}
Future<dynamic> getCityWeather(cityName) async {
NetworkHelperCity networkHelperCity = NetworkHelperCity(cityName, appid);
var weatherData = networkHelperCity.getWeather();
return weatherData;
}
String getWeatherIcon(int condition) {
if (condition < 300) {
return '🌩';
} else if (condition < 400) {
return '🌧';
} else if (condition < 600) {
return '☔️';
} else if (condition < 700) {
return '☃️';
} else if (condition < 800) {
return '🌫';
} else if (condition == 800) {
return '☀️';
} else if (condition <= 804) {
return '☁️';
} else {
return '🤷';
}
}
String getMessage(int temp) {
if (temp > 25) {
return 'It\'s 🍦 time';
} else if (temp > 20) {
return 'Time for shorts and 👕';
} else if (temp < 10) {
return 'You\'ll need 🧣 and 🧤';
} else {
return 'Bring a 🧥 just in case';
}
}
}
1
2
3
4
5
6
7
8
9
10
11
12
13
14
15
16
17
18
19
20
21
22
23
24
25
26
27
28
29
30
31
32
33
34
35
36
37
38
39
40
41
42
43
44
45
46
47
48
49
50
51
52
53
54
55
56
2
3
4
5
6
7
8
9
10
11
12
13
14
15
16
17
18
19
20
21
22
23
24
25
26
27
28
29
30
31
32
33
34
35
36
37
38
39
40
41
42
43
44
45
46
47
48
49
50
51
52
53
54
55
56
getLocationWeather에서는Location클래스와networkHelper클래스를 이용해서 현위치의weatherData를 얻는다.getCityWeahter에서는 도시로 검색하여 현위치의weatherData를 얻는다.getWeatherIcon과getMessage로weatherData에서 얻은 값을 치환해서 return 해준다.
# routing services
route_generator
import 'package:flutter/material.dart';
import 'package:clima/screens/loading_screen.dart';
import 'package:clima/screens/location_screen.dart';
import 'package:clima/screens/city_screen.dart';

class RouteGenerator {
  static Route<dynamic> generateRoute(RouteSettings settings) {
    final args = settings.arguments;

    switch (settings.name) {
      case '/':
        return MaterialPageRoute(builder: (context) => LoadingScreen());
      case '/location':
        return MaterialPageRoute(builder: (context) {
          return LocationScreen(args);
        });
      case '/city':
        return MaterialPageRoute(builder: (context) => CityScreen());

      default:
        return _errorRoute();
    }
  }

  static Route<dynamic> _errorRoute() {
    return MaterialPageRoute(builder: (context) {
      return Scaffold(
          appBar: AppBar(
            title: Text('ERROR'),
            centerTitle: true,
          ),
          body: Center(child: Text('Page not found')));
    });
  }
}
1
2
3
4
5
6
7
8
9
10
11
12
13
14
15
16
17
18
19
20
21
22
23
24
25
26
27
28
29
30
31
32
33
34
35
36
2
3
4
5
6
7
8
9
10
11
12
13
14
15
16
17
18
19
20
21
22
23
24
25
26
27
28
29
30
31
32
33
34
35
36
- 이전까지는
main.dart에서router를 만들어줬지만 이번에는 별도 파일로 만들어서 관리해줬다. generateRoute에 들어오는settings인자에서settings.name을 통해서 url을 관리한다.settings.arguments를 통해서props를 관리한다._errorRoute를 통해서 404를 처리해준다.
# 2. utilities
constants.dart
import 'package:flutter/material.dart';

const kTempTextStyle = TextStyle(
  fontFamily: 'Spartan MB',
  fontSize: 100.0,
);

const kMessageTextStyle = TextStyle(
  fontFamily: 'Spartan MB',
  fontSize: 40.0,
);

const kButtonTextStyle = TextStyle(
  fontSize: 30.0,
  fontFamily: 'Spartan MB',
);

const kConditionTextStyle = TextStyle(
  fontSize: 100.0,
);

const kInputDecoration = InputDecoration(
  filled: true,
  fillColor: Colors.white,
  icon: Icon(
    Icons.location_city,
    color: Colors.white,
  ),
  hintText: "Enter city Name",
  hintStyle: TextStyle(color: Colors.grey),
  border: OutlineInputBorder(
    borderRadius: BorderRadius.all(
      Radius.circular(10),
    ),
    borderSide: BorderSide.none,
  ),
);
1
2
3
4
5
6
7
8
9
10
11
12
13
14
15
16
17
18
19
20
21
22
23
24
25
26
27
28
29
30
31
32
33
34
35
36
37
38
2
3
4
5
6
7
8
9
10
11
12
13
14
15
16
17
18
19
20
21
22
23
24
25
26
27
28
29
30
31
32
33
34
35
36
37
38
- constants를 별도 파일로 관리.
- k를 붙여서 constant를 관리해줬다.
- 현재는 더이상 권장하지 않는 practice인 것 같다.
# 3. screens
loading_screen.dart
import 'package:flutter/material.dart';
import 'package:flutter_spinkit/flutter_spinkit.dart';
import 'package:clima/services/weather.dart';
class LoadingScreen extends StatefulWidget {
_LoadingScreenState createState() => _LoadingScreenState();
}
class _LoadingScreenState extends State<LoadingScreen> {
double lat;
double lon;
void initState() {
// TODO: implement initState
super.initState();
getLocationData();
}
void getLocationData() async {
WeatherModel weatherModel = WeatherModel();
var weatherData = await weatherModel.getLocationWeather();
Navigator.pushNamed(context, '/location', arguments: weatherData);
}
Widget build(BuildContext context) {
return Scaffold(
body: Center(
child: SpinKitChasingDots(
color: Colors.white,
size: 50.0,
)));
}
}
1
2
3
4
5
6
7
8
9
10
11
12
13
14
15
16
17
18
19
20
21
22
23
24
25
26
27
28
29
30
31
32
33
34
35
36
37
38
2
3
4
5
6
7
8
9
10
11
12
13
14
15
16
17
18
19
20
21
22
23
24
25
26
27
28
29
30
31
32
33
34
35
36
37
38
- 어플리케이션 첫 실행 로딩화면에서 api response가 아직 안왔다면
spinkit을 이용해서 로딩 스크린을 만들어준다. - api response가 도착하면
Navigator.pushNamed를 통해location스크린으로 이동한다. - props를
arguments: weatherData형태로 전달한다.
location_screen.dart
import 'package:flutter/material.dart';
import 'package:clima/utilities/constants.dart';
import 'package:clima/services/weather.dart';
class LocationScreen extends StatefulWidget {
static const routeName = '/location';
final weatherData;
LocationScreen(this.weatherData);
_LocationScreenState createState() => _LocationScreenState();
}
class _LocationScreenState extends State<LocationScreen> {
void initState() {
// TODO: implement initState
super.initState();
updateUI(widget.weatherData);
}
var weatherData;
WeatherModel weatherModel = WeatherModel();
int temperature;
String message;
int condition;
String weatherIcon;
String cityName;
void updateUI(weatherData) {
setState(() {
if (weatherData == null) {
temperature = 0;
message = "unable to get weather";
weatherIcon = "?";
cityName = "Sorry";
return 1;
}
temperature = weatherData['main']['temp'].toInt();
message = weatherModel.getMessage(temperature);
condition = weatherData['weather'][0]['id'];
weatherIcon = weatherModel.getWeatherIcon(condition);
cityName = weatherData['name'];
});
}
Widget build(BuildContext context) {
return Scaffold(
body: Container(
decoration: BoxDecoration(
image: DecorationImage(
image: AssetImage('images/location_background.jpg'),
fit: BoxFit.cover,
colorFilter: ColorFilter.mode(
Colors.white.withOpacity(0.8), BlendMode.dstATop),
),
),
constraints: BoxConstraints.expand(),
child: SafeArea(
child: Column(
mainAxisAlignment: MainAxisAlignment.spaceBetween,
crossAxisAlignment: CrossAxisAlignment.stretch,
children: <Widget>[
Row(
mainAxisAlignment: MainAxisAlignment.spaceBetween,
children: <Widget>[
FlatButton(
onPressed: () async {
var weatherData = await weatherModel.getLocationWeather();
updateUI(weatherData);
},
child: Icon(
Icons.near_me,
size: 50.0,
),
),
FlatButton(
onPressed: () {
Navigator.pushNamed(context, '/city',
arguments: weatherData);
},
child: Icon(
Icons.location_city,
size: 50.0,
),
),
],
),
Padding(
padding: EdgeInsets.only(left: 15.0),
child: Row(
children: <Widget>[
Text(
'$temperature°',
style: kTempTextStyle,
),
Text(
'$weatherIcon',
style: kConditionTextStyle,
),
],
),
),
Padding(
padding: EdgeInsets.only(right: 15.0),
child: Text(
"$message in $cityName!",
textAlign: TextAlign.right,
style: kMessageTextStyle,
),
),
],
),
),
),
);
}
}
1
2
3
4
5
6
7
8
9
10
11
12
13
14
15
16
17
18
19
20
21
22
23
24
25
26
27
28
29
30
31
32
33
34
35
36
37
38
39
40
41
42
43
44
45
46
47
48
49
50
51
52
53
54
55
56
57
58
59
60
61
62
63
64
65
66
67
68
69
70
71
72
73
74
75
76
77
78
79
80
81
82
83
84
85
86
87
88
89
90
91
92
93
94
95
96
97
98
99
100
101
102
103
104
105
106
107
108
109
110
111
112
113
114
115
116
117
118
119
120
- props인
weatherData를 받는다. updateUI를 통해서 weatherData를 state에 반영한다.init시에도updateUI를 실행한다.near_me아이콘으로 내 근처의 weatherData를 받아오거나location_city아이콘으로 도시별 weatherData를 검색하는 페이지로 이동한다.
city_screen.dart
import 'package:flutter/material.dart';
import 'package:clima/utilities/constants.dart';
import 'package:clima/services/weather.dart';
class CityScreen extends StatefulWidget {
_CityScreenState createState() => _CityScreenState();
}
class _CityScreenState extends State<CityScreen> {
String cityName;
WeatherModel weatherModel = WeatherModel();
Widget build(BuildContext context) {
return Scaffold(
body: Container(
decoration: BoxDecoration(
image: DecorationImage(
image: AssetImage('images/city_background.jpg'),
fit: BoxFit.cover,
),
),
constraints: BoxConstraints.expand(),
child: SafeArea(
child: Column(
children: <Widget>[
Align(
alignment: Alignment.topLeft,
child: FlatButton(
onPressed: () {
Navigator.pop(context);
},
child: Icon(
Icons.arrow_back_ios,
size: 50.0,
),
),
),
Container(
padding: EdgeInsets.all(20.0),
child: TextField(
style: TextStyle(color: Colors.black),
decoration: kInputDecoration,
onChanged: (value) {
cityName = value;
},
),
),
FlatButton(
onPressed: () async {
print(cityName);
var weatherData = await weatherModel.getCityWeather(cityName);
print(weatherData);
Navigator.pushNamed(context, '/location',
arguments: weatherData);
},
child: Text(
'Get Weather',
style: kButtonTextStyle,
),
),
],
),
),
),
);
}
}
1
2
3
4
5
6
7
8
9
10
11
12
13
14
15
16
17
18
19
20
21
22
23
24
25
26
27
28
29
30
31
32
33
34
35
36
37
38
39
40
41
42
43
44
45
46
47
48
49
50
51
52
53
54
55
56
57
58
59
60
61
62
63
64
65
66
67
68
69
70
2
3
4
5
6
7
8
9
10
11
12
13
14
15
16
17
18
19
20
21
22
23
24
25
26
27
28
29
30
31
32
33
34
35
36
37
38
39
40
41
42
43
44
45
46
47
48
49
50
51
52
53
54
55
56
57
58
59
60
61
62
63
64
65
66
67
68
69
70
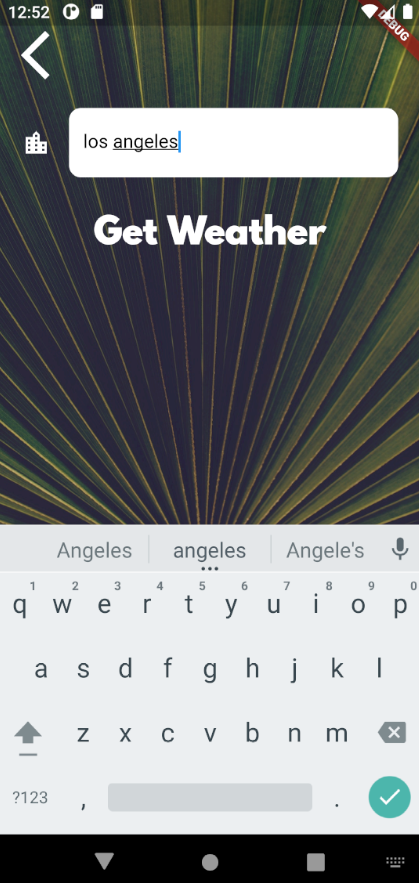
- 도시별 날씨를 검색하는 페이지
weatherModel.getCityWeather로 도시별 검색 api를 실행하고 response가 오면 다시location스크린으로 이동하고weatherData를 props로 전달해준다.
# 4. main
main.dart
import 'package:flutter/material.dart';
import 'services/route_generator.dart';
void main() => runApp(MyApp());
class MyApp extends StatelessWidget {
Widget build(BuildContext context) {
return MaterialApp(
theme: ThemeData.dark(),
initialRoute: '/',
onGenerateRoute: RouteGenerator.generateRoute);
}
}
1
2
3
4
5
6
7
8
9
10
11
12
13
14
15
2
3
4
5
6
7
8
9
10
11
12
13
14
15
initialRoute와onGenerateRoute를 이용했기 때문에 간소한main.dart를 즐길 수 있다.
